Showing posts with label nars. Show all posts

Saturday, 21 November 2015

FOTD: Bold Lashes And Soft Lips


I really enjoyed my makeup last night for a 21st so I thought I would share as the photo lighting was just too good not too. I decided on lashes so big I could almost fly away and soft pink lips, here are the products I used to achieve this look;


  • Benefit Porefessional
  • Mac Skin Refined Zone
  • Mac Studio Fix Foundation
  • Mac Prolong wear Concealer
  • Elf Under eye Setting Powder
  • Nutrimetics Satin Finish Powder
  • Benefit Hoola Bronzer
  • Nars Blush in Orgasm
  • Becca Skin Perfecter in Moonstone
  • Hard Candy Lip Liner (which I took out with me and lost)
  • YSL Rouge Volupte Perle 108


  • Nars Eyeshadow Primer
  • Maybelline Colour Tattoo in Too Cool
  • Lorac Pro Palettes
  • Urban Decay Black Liner
  • Favourite $1 Liquid Eyeliner
  • Benefit They're Real Mascara
  • Anastasia Brow Pomade
  • Australis Clear Brow Gel
  • Glam By Manicare Madonna Lashes


As crazy as the lashes are I actually became obsessed with them and I plan on grabbing a few more packets! I hope you're having a nice day, thanks so much for stopping by.

Monique xx


Saturday, 24 October 2015

FOTD: Spring Night Time Look


I admit I'm pretty slack as It's been a while since I have posted a face of the day, but last night my partner and I had a date night so I decided to play around with a little colour to embrace the warmer weather. Here are the products I used to achieve this look;


  • Benefit Porefessional Primer
  • Mac Prep and Prime Skin Refined Zone
  • Bare Minerals Bare Skin Foundation sample
  • Mac Prolong Wear Concealer 
  • Chanel Soleil Tan De Chanel
  • Rimmel Stay Matte Powder
  • Benefit Hoola Bronzer
  • Too Faced Love Flushed Blush In 'Justify My Love'
  • Becca Moonstone Skin Perfecter
  • Australis Velourlips in 'Lun-Dun'


  • Too Faced Shadow Insurance Primer sample
  • Maybelline Colour Tattoo In 'Fierce and Tangy'
  • Too Faced Chocolate Bar Palette
  • Nars China Seas Duo
  • Nars Long-Wear Eye Liner in 'Gratis'
  • Urban Decay 24/7 Pencil in 'Zero'
  • Favourite $1 Liquid Liner Found Here
  • Benefit They're Real Mascara
  • Anastasia Beverly Hills Dip Brow Pomade In 'Taupe'
  • Lash Control Clear Gel

My hooded lids usually distort any eyeshadow pictures I try to take, but hopefully you can see the contrast of orange on the lid and the beautiful Nars Gratis on the lash line. I really enjoyed wearing this makeup look and I have been adding bright colours to my lash line a lot lately.


Thank you so much for stopping by my blog and here's a little reminder that It's only 2 months until Christmas today! I'm way too excited and started wrapping Christmas presents yesterday… Let me know If you are prepared for Christmas or not!

Monique xx


Monday, 17 November 2014

FOTD: Cocktail Party Makeup


It was my partners 21st birthday party over the weekend and the theme was cocktail, so I decided on some glamourous makeup with a hint of glitter, heres the products I used!


I'm pretty safe and boring when it comes to my face products, often using the same things. Although some newbies I have been loving recently is the Stila All Over Shimmer Duo in Kitten, a stunning highlighter that contains a lighter shimmery shade as well as a bronze shade. I love using the lighter shade for a subtle glow on the top of my cheeks and cupids bow. I have also been testing out the Mac Prep and Prime Skin Refined Zone after reading some great reviews on it for oily skin. I have noticed my nose hasn't been going as shiny as quickly although I feel I haven't tested it out enough to give a full opinion on it.


Having oily skin I knew that I needed an excellent base if I wanted to apply glitter onto my eyes and not have it all over my face half way through the night. So what better base could I use other than eyelash glue itself! I did risk losing a few eyelashes although the glitter stuck on fantastically as you can imagine and I found it quite easy. I used the Eyelure eyelash glue and If you have ever used this brand of eyelash glue before you will know that it smells terrible when you first apply it, although I find it to be one of the best eyelash glues on the market so I find the smell is worth bearing through.


The silver glitter I used was only $2 or $3 from the brand L.A Girl available on CherryCulture.com. It has a great dispenser hole that allows you to dip your brush inside, preventing glitter from going absolutely everywhere. I think it's fantastic for the price and I plan on picking up many more colours! Another new product I have been using is the Lash Control Clear Mascara for setting my brows. Apparently its the only mascara on the market that enables you to control the amount of product you use by squeezing the clear tube. I honestly think its a bit gimmicky although it does set my brows nicely. 


I loved incorporating some glitter into the look and thought the cocktail theme was the perfect opportunity to wear it. Let me know if you like to add anything a little extra to your look for those special occasions. Thanks so much for reading!

Monique xx 


Sunday, 26 October 2014

EOTD: Dramatic Teal Smokey Eye

Back in July I posted a simple teal smokey eye look using the same gorgeous 'Aquarius' shadow in the Urban Decay Feminine palette, but last night I decided to try out a more dramatic look for a 21st party. As I knew we were eating there I avoided dark lips and opted for a nude, so I couldn't think of a better opportunity to play with some colour on the eyes.


I purchased the Urban Decay Feminine palette from Allcosmeticswholesale.com and I'm so glad I did, the bright purple and teal shade make the palette worthwhile alone. The Sleek 'oh so special' palette has been another constant reach for me lately, for this look I used the matte warm taupe and black shadows. I patted the matte black from the Sleek palette on the outer corner and with whatever excess was on my brush I would put lightly in the inner corner, leaving a small blank space in the middle of my lid for the gorgeous teal shade.


I love how the teal looked against the black and think this look would be so amazing on brown eyes. Sadly not even the amazing Nars eyeshadow primer was able to stand the warmer weather and my shadow creased after a couple of hours, damn you oily skin. Anyway thanks so much for stopping by my blog!

Monique xx

Saturday, 11 October 2014

FOTD: Spring Clubbing Look

I posted my go - to clubbing look back in July, which is dark and vampy. And now I'm sharing what I would consider a spring edition. Heres the makeup mess!


Of course I forgot to photograph one of the new products I'm testing out- the Mac Prep and Prime Skin Refined zone, a raved about primer for oily skin. I've only used it twice so far and I'm not sure what to think of it just yet but I'm sure I'll do a review on it eventually! I have been lusting after the new Velourlips matte lip creme range ever since they announced the new colours (actually I've been desperate to buy the original colours too but I must not give in to my lip product addiction). As I didn't have any colour like it I picked up the shade 'Lun- Dun' which is a vibrant pinky purple, I absolutely love it! Anddd besides that I'm still sticking too my favourite products for clubbing, including Benefits 'Hoola' bronzer, Mac Studio Fix foundation and Nars 'Orgasm' blush. I think its time to try out some new products!


I think the look is suitable for spring and the smokey warmed toned eye makes it a little more dramatic for hitting the town. Let me know if you change your makeup up to suit the weather or if you just like the same look all year round (you'll still see me rocking a vampy lip in summer of course). Thanks for stopping by my blog!

Monique xx


Monday, 15 September 2014

First Impressions: Nars Smudge Proof Eyeshadow Base


Having oily eyelids is pretty much a curse, you spend a ridiculous amount of time blending out and applying beautiful eyeshadows, to go look in the mirror an hour or two later and find that your gorgeous creation is now a hot creased mess. Let me tell you, I've tried multiple paint pots, colour tattoos, mineral eye primers and even the raved about Urban Decay primer potion multiple times and yet nothing will give me the confidence to go out for a full day without worrying about my eyeshadow creasing. So after reading many claims that the Nars Smudge Proof Eyeshadow Base was a god send for oily lids, I had to pick it up. I've tested it out and today I'm going to let you know my first impressions of the product, and does it live up to the hype!


Well, you don't need me to tell you that the packaging of the product is simply stunning, I purchased it for $34 from Mecca, and was surprised at how big the tube was, which is great because at $34 a pop I don't want to be repurchasing this eye primer frequently (unless it makes my eyeshadow look like real diamonds or something crazily awesome). The applicator is a simple doe foot and the consistency is just like any other liquid primer, this one is white/clear and dries on contact- it won't change any eyeshadow that you put on top of it. 


I created a simple neutral look for the first time testing out this primer - something similar to what I would wear on a working day. Before applying the shadows I focused the primer on my lid and crease, which is usually where the eyeshadow looks super gross at the end of the day. The day was quite humid and you guys know that shopping is a form of exercise right... So basically this eyeshadow was under extreme conditions, I kept it on for a good 12 hours before inspecting my eyeshadow again later that night;


I was so impressed with the outcome 12 hours later! As you can see there is slight creasing near the inner corner of my eye. Using other primers, my whole lid area would be creased and separated after 2-3 hours of wear. My liner still looked practically new and the matte crease colour still looked great too. I'm not going to claim that this primer is bullet proof- but I'm definitely impressed at its ability to keep my eyeshadows in place, especially after such a long day.

I feel now that I can use this primer and go much longer without having to worry about touching up my eyeshadow, and actually use eyeshadow in general on a woking day- before I didn't even bother as I knew it would look terrible after a few hours! My first impression of this product is great, and I look forward to testing it out more, I'm sure it will definitely be making more star appearances on the blog.

Let me know what you think of the outcome and if you have any holy grail eye primers that you think I should test out! Thanks so much for reading,

Monique xx


Monday, 18 August 2014

Come Play With Me: Winter Into Spring

When I think of spring beautiful flowers are the first thing to come to mind, bright and all different colours. So when the lovely Kats from Kat's Colourings decided on the new theme 'Winter Into Spring' for The Come Play With Me series, I was slightly stumped, but eventually decided to pay tribute to one of my favourite bright colours, orange!


Orange lipstick is one of my absolute favourite colours to wear, so I decided on showing two from my collection that are extremely comparable in terms of looks, although complete opposites when it comes to price. The Colour by TBN moisturising lipstick in the shade 'Kiss and Makeup' is a beauty I stumbled upon last year. At first glance I thought they were the Revlon Lip Butters, although after closer inspection they were nothing like the lip butters in terms of consistency, but instead very moisturising, opaque lipsticks. At $2.50 each from most chemists, I have since picked up another, they are so cheap and so good it's hard not to purchase them all! I have seriously fallen in love with these lipsticks and its pretty crazy that I find them extremely comparable to my Nars Satin Lip Pencil.

Top: TBN  Bottom: Nars
I own the shade 'Timanfaya' in the Nars satin lip pencil and it's another one of my favourites. As you can see in the comparison photo, the colour pay off and vibrancy from the two lip products is almost identical. If anything the TBN lipstick is slightly creamier and less 'in your face'. When wearing this shade out I'll often apply the Nars pencil at home, and then use the TBN lipstick for touchups out and about in case I damage or lose the pencil. Lets be honest having to replace a $2.50 lipstick rather than a $34 one is a lot less heart breaking! Although If you do decide to splurge, the Nars lip pencil is definitely worth it and is available here.


Why stop at orange lips when I can have orange nails too! These four are the oranges I have in my collection, I went for a more toned down orange today and chose the shade 'Barbados' by Rokk 96. It's a lovely burnt orange shade that applies opaque after one coat, sadly my nail painting skills weren't up to scratch today so you'll just have to ignore my horrific efforts!


And to finish off my orange tribute I decided to add an orange flush to my cheeks. My pick is the Fox in a Box blush by Hard Candy in the shade 'Skinny Dipping', a very suitable name considering the spring theme!


These blushes are gorgeous and I wish they were more accessible in Australia! I purchased mine from Allcosmeticswholesale.com and I haven't looked back since. The two shades can be used separately or together, I personally like a combination of the two. It gives my cheeks a perfect soft orange glow that complements orange lips so well without over doing it. 


Despite it still being winter, orange is a colour I'll rock all throughout the year! If you haven't already definitely check out Kat'sIndie's and Hailey's stunning takes on the theme. Thanks so much for reading and let me know if you have any orange beauty favourites!

Monique xx


Friday, 1 August 2014

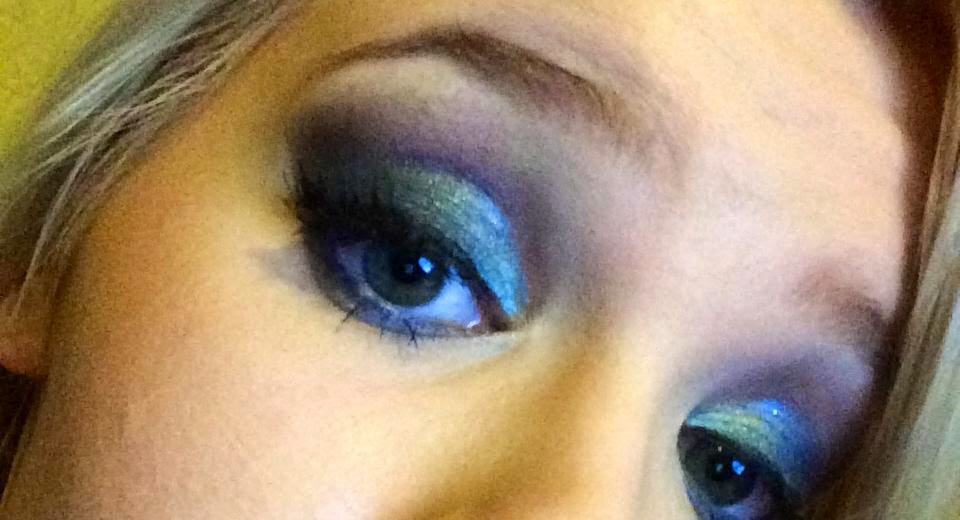
EOTD: Smokey Blues


I wasn't sure about uploading this one as I totally failed at getting any decent photos of my eye makeup, as the sun went down faster than I expected. Regardless of the bad photography I thought I would share anyway as after all what have I got to lose!


I seem to be embracing colourful eyes a lot lately! I wore a dark blue dress out for dinner last night and really wanted to use one of my favourite eyeshadows, 'Frosted Ocean' by NYX. Ignore my shocking nails, but Frosted Ocean is a beautiful shade from Nyx that I wish I could wear more often. It's an insanely pigmented rich blue, packed with light blue glitters. 


Firstly I put the Maybelline colour tattoo in Too Cool on the lid as a base so that the colours really popped, followed by the blue shade from the Nars China Seas eyeshadow duo on the inner corner of my eye. For the star of the show, I packed Frosted Ocean heavily all over the lid, getting blue fallout all over my face was inevitable considering the glitter in this shadow, but in my opinion it's worth it for the colour pay off. I blended everything out and focused on the outer corner with the Bloom single eyeshadow in Ash, which is exactly like the name - a grey ashy colour. And when you think there couldn't be anymore blue, I added the Nars long wear liner in Gratis onto my water line. Ofcourse the look was finished with a thick winged eyeliner as always, mascara and some half lashes.


I loved wearing this blue eyeshadow combo and the whole night I continued to sing 'Im blue ba da di da da die'. Thanks for stopping by my blog and bearing through the bad photography, be sure to let me know if you're a fan of blue eyeshadows!

Monique xx